Four RTX 6000 Blackwell GPUs in One Machine: 384GB of VRAM for Local LLM Inference
By Jagane Sundar and Nikhil Koduri
At OXMIQ Labs, we develop AI technologies all the way from GPU hardware to Model Orchestration software.
Running 70B, 120B, or even larger language models locally requires serious hardware. Cloud inference works for prototyping, but for production workloads, sensitive data, or simply avoiding per-token costs, you need local GPU power.
In this post, we'll show you how to build a single workstation with four NVIDIA RTX 6000 Blackwell GPUs: 384GB of total VRAM and over 500 TFLOPs of FP32 compute. The catch?
NVIDIA's software stack artificially limits you to two PCIe GPUs for collective operations. We'll show you how to work around that.
The RTX 6000 Blackwell Advantage
The RTX 6000 Blackwell Workstation Edition is NVIDIA's flagship professional GPU, and four of them in a single system deliver remarkable capabilities:
Spec
4x RTX 6000 Blackwell
FP32 Compute
~500 TFLOPs
Total VRAM
384GB (96GB per card)
Memory Bandwidth
~960 GB/s per card
FP4 AI Performance
1000+ TOPS per card
Interconnect
PCIe 5.0 (128 GB/s per card)
This is enough memory to run a 120B parameter model in FP16, or significantly larger models with quantization. The Blackwell architecture's FP4 capabilities make it particularly well-suited for quantized inference workloads.
The Hardware
Our Quad Blackwell Build:
Motherboard: ASRock Rack GENOAD8X-2T/BCM
CPU: AMD EPYC 9354 32-Core Processor
Cooler: Silverstone Technology XE04-SP5
RAM: 256 GB ECC Registered DDR5 4800
PSUs: 2x 1600W PSUs
GPUs: 4x NVIDIA RTX 6000 PRO Blackwell Workstation Edition
PC Case: Phanteks Enthoo Pro 2 Full Tower
Yoidesu Dual PSU Multiple Power Supply Adapter (ATX 24Pin to Molex 4Pin)
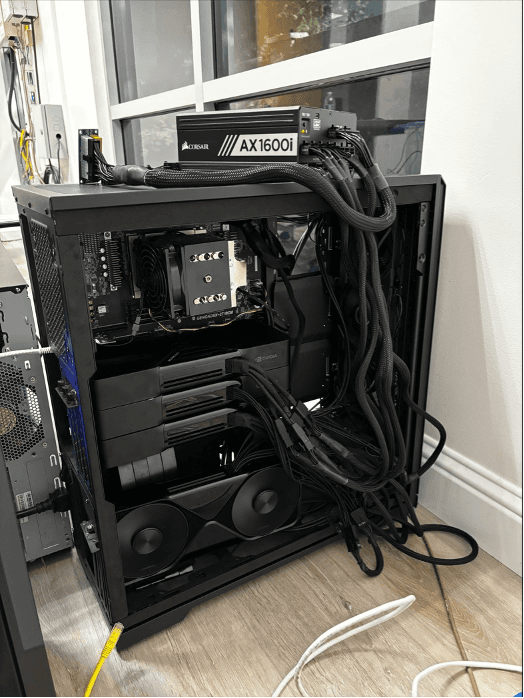
Estimated Total: ~$38,200 (with normal RAM pricing) Here is the box we hacked together 😊
The Hardware Challenges: Fitting & Powering Four GPUs in One Box
Challenge #1: Power Requirements
Each RTX 6000 Blackwell draws up to 350W under load. With four cards, that's 1400W for the GPUs alone before accounting for the AMD EPYC CPU (300W TDP), memory, storage, and cooling fans. Peak system draw can easily exceed 2000W.
Most high-end consumer and workstation power supplies max out at 1600W. You have two options:
Industrial/server PSU: Some vendors offer 2000W+ ATX power supplies, but they're expensive, loud, and may require 20A circuits or 240V input.
Dual PSU configuration (what we did): Use two standard power supplies (e.g., two 1600W units) connected with a Dual PSU Multiple Power Supply Adapter (ATX 24-pin to Molex 4-pin). This adapter synchronizes the start signal between PSUs so they power on together. One PSU powers the motherboard, CPU, and two GPUs; the second powers the remaining two GPUs.
Challenge #2: 4 Blackwells Hang the System After Booting
Having 4 RTX 6000 Pro Blackwells caused frequent hangs and boot issues. While two cards worked perfectly, adding the third card with the second PSU prevented the system from posting. I immediately suspected a PSU issue and spent days researching.
What finally fixed everything was forcing each slot to run on PCIe Gen4 instead of Gen5. I found that the Blackwells have PCIe instability issues, and using server-class motherboards also comes with their own quirks and issues.
Challenge #3: Fitting 4 Cards in One Box
We needed a chassis to accommodate our E-ATX motherboard and 4 GPUs. We found the Phanteks Enthoo Pro 2 Full Tower (unfortunately out of stock everywhere). This case allows vertical mounting of one GPU, enabling us to fit all four cards in one box. We used a PCIe riser cable to connect the final card. We unfortunately did not account for a spot to add the second PSU, so this chassis isn't perfect but gets the job done. (Refer to image)
The Software Challenge: NCCL's Two-GPU Limit
Here's where it gets interesting. NVIDIA's NCCL (NVIDIA Collective Communications Library) is the standard for multi-GPU communication. It handles the all-gather and allreduce operations that tensor parallelism requires. But NCCL enforces a maximum of two PCIe NVIDIA GPUs for peer-to-peer communication in a single process.
Try to initialize four GPUs in one container, and you'll hit errors or severely degraded performance.
The Workaround: Containerized GPU Isolation
The solution is to split your GPUs across multiple Docker containers, with each container seeing at most two GPUs. We then use Ray to orchestrate distributed inference across containers, with NCCL communicating over TCP sockets instead of PCIe peer-to-peer.
This introduces some overhead compared to native NVLink, but it works—and for inference workloads (as opposed to training), the performance is excellent.
Architecture Overview
We'll use a 2x2 configuration: two containers, each with two GPUs. Within each container, the GPUs communicate via PCIe (fast). Between containers, NCCL uses TCP sockets over the Docker network.
With this setup, we can run:
Pipeline Parallel = 2, Tensor Parallel = 2: Each pipeline stage spans one container, with tensor parallelism across the two GPUs within that container
Pipeline Parallel = 4, Tensor Parallel = 1: Each GPU handles one pipeline stage
(simpler, slightly lower throughput)
Capsule: Our In-House GPU Cloud
At OXMIQ Labs, we use a system called Capsule to manage and share our GPU-enabled hardware across the team. Capsule functions as an in-house GPU cloud—we register all of our GPU systems and tag them with descriptive labels (e.g., Nvidia-RTX6000x4 for a quad RTX 6000 machine). When a developer needs access to specific hardware, they simply request it with a single command.
This approach gives us the flexibility of cloud computing—on-demand access to powerful hardware—without the per-hour costs or data privacy concerns. Developers don't need to know which physical machine they're getting; they just specify the capabilities they need, and Capsule handles the rest.
Step-by-Step Setup
Step 0 - Acquire the System via Capsule
If you're using Capsule, request a quad RTX 6000 system:
bashcapsule launch Nvidia-RTX6000x4
bashcapsule launch Nvidia-RTX6000x4
bashcapsule launch Nvidia-RTX6000x4
bashcapsule launch Nvidia-RTX6000x4
bashcapsule launch Nvidia-RTX6000x4
Once the system is allocated, SSH in and proceed with the setup below. If you're working directly on your own hardware, skip to Step 1.
Step 1 - Configure NCCL
This tells NCCL to:
Create a file called nccl.conf in your working directory:
Use socket-based networking instead of RDMA/InfiniBand
Use IPv4 sockets
Disable InfiniBand (not present in this workstation setup)
For debugging, you can add NCCL_DEBUG=INFO and NCCL_DEBUG_SUBSYS=ALL .
Step 2 - Download Your Model
For this example, we'll use a 120B parameter model. Download it to /opt/models :
mkdir -p /opt/models
# Use huggingface-cli or your preferred method to downloadhuggingface-cli download openai/gpt-oss-120b --local-dir /opt/models/huggingface/models--openai--gpt-oss-120b
mkdir -p /opt/models
# Use huggingface-cli or your preferred method to downloadhuggingface-cli download openai/gpt-oss-120b --local-dir /opt/models/huggingface/models--openai--gpt-oss-120b
mkdir -p /opt/models
# Use huggingface-cli or your preferred method to downloadhuggingface-cli download openai/gpt-oss-120b --local-dir /opt/models/huggingface/models--openai--gpt-oss-120b
mkdir -p /opt/models
# Use huggingface-cli or your preferred method to downloadhuggingface-cli download openai/gpt-oss-120b --local-dir /opt/models/huggingface/models--openai--gpt-oss-120b
mkdir -p /opt/models
# Use huggingface-cli or your preferred method to downloadhuggingface-cli download openai/gpt-oss-120b --local-dir /opt/models/huggingface/models--openai--gpt-oss-120b
Step 3 - Launch the Head Container
This container gets GPUs 0 and 1, runs the Ray head node, and exposes the vLLM API:
The model will load across all four GPUs. You now have an OpenAI-compatible API running on port 8000.
Step 6 - Test the Endpoint
curl http://localhost:8000/v1/completions \
-H"Content-Type: application/json" \
-d'{ "model": "gpt-oss-120b", "prompt": "The future of AI is", "max_tokens": 100 }'
curl http://localhost:8000/v1/completions \
-H"Content-Type: application/json" \
-d'{ "model": "gpt-oss-120b", "prompt": "The future of AI is", "max_tokens": 100 }'
curl http://localhost:8000/v1/completions \
-H"Content-Type: application/json" \
-d'{ "model": "gpt-oss-120b", "prompt": "The future of AI is", "max_tokens": 100 }'
curl http://localhost:8000/v1/completions \
-H"Content-Type: application/json" \
-d'{ "model": "gpt-oss-120b", "prompt": "The future of AI is", "max_tokens": 100 }'
curl http://localhost:8000/v1/completions \
-H"Content-Type: application/json" \
-d'{ "model": "gpt-oss-120b", "prompt": "The future of AI is", "max_tokens": 100 }'
Option 2: Pipeline parallel four single GPU containers
In this arrangement, we have slightly higher latency (more pipeline stages) but is easier to debug and doesn't require any intra-container GPU communication.

" height="379px" id="IzMktMif4" transform="translate(0 -0.5)" width="1876.0000660911624px"/></svg>)